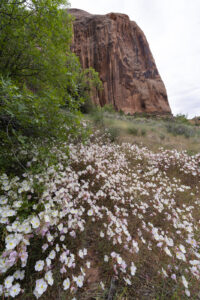
The winter rains in the west brought some pretty wildflowers this spring to the Moab, UT area. I visited Arches and Canyonlands along with Grandstaff Canyon on this trip. Mountain Pepper plant was by far the most prolific flower in Arches while evening primrose was exploding near Green River.
Arches had an incredible bloom of mountain pepper plant near Balanced Rock, It seemed every bush was in full bloom. Meanwhile, Canyonlands had nice displays of lupine and desert paintbrush. Grandstaff Canyon is a verdant canyon located just 4 miles east of Moab along Highway 128. The canyon used to be named Negor Bill Canyon for those of you who remember that name. Huge patches of globe mallow and primrose were blooming in the canyon.
Mountain Pepper Plant, Balanced Rock, Arches National Park, Moab, UT
Firecracker penstemon, Wolff Ranch, Arches National Park, Moab, UT
Mountain Pepper Plant, Arches National Park, UT
Mountain Pepper Plant, Arches National Park, Moab, UT
Mules Ear, Arches National Park, UT
Evening Primrose, Arches National Park, UT
Claret Cup, Canyonlands National Park, UT
Mountain Pepper Plant, Balanced Rock, Arches National Park, Moab, UT
Mules Ear, Arches National Park, UT
Mountain Pepper Plant, , Arches National Park, Moab, UT
Desert Paintbrush, Canyonlands Nations Park, UT
Whale Rock, Desert Paintbrush, Canyonlands Nations Park, UT
Lupine, Canyonlands National Park, UT
Globemallow, Grandstaff Canyon, Moab, UT
Evening primrose, Grandstaff Canyon, Moab, UT
Morning Gory Bridge, Grandstaff Canyon, Moab, UT
Evening primrose, Grandstaff Canyon, Moab, UT
Claret Cup and Globemallow, Grandstaff Canyon, UT
Evening primrose, Grandstaff Canyon, Moab, UT
Evening Primrose, near Horseshoe Canyon, UT
Desert paintbrush, Horseshoe Canyon, Canyonlands National Park, UT
Pictoglyphs, Alcove Panel, Horseshoe Canyon, Canyonlands National Park, UT
I took advantage of our record warm weather this past week to head out to Utah and explore the Grand Staircase Escalante National Monument. There were a few places I had been meaning to photograph for years so I was glad I finally had the opportunity to get back out there. Zebra Canyon in particular has been on my radar and I am happy to report I finally made it there.
Horseshoe Canyon Grand Gallery
My trip started with a stop at the Horseshoe Canyon unit of Canyonlands National Park. This is where the Grand Gallery pictograph panel is located. It is in a remote part of the park that is located off a dirt road about 25 miles from the main highway. The hike itself is beautiful. Most of the hike is an easy stroll through the lush Horseshoe Canyon after descending a short slickrock slope at the start. The canyon is very verdant and a striking contrast to many parts of Canyonlands. The pictograph and petroglyphs start appearing about 1.5 miles into the hike. Several panels can be seen along the route. The most prominent ones are located in the Alcove at the 2.5 mile mark, and the biggest one is found in the Grand Gallery at mile 3.5. There were even a few wildflowers to liven up the hike.
I also stopped at nearby trail for Colonade Arch or as it is also known Five Hole Arch. Located just outside the national park, the trail starts at the end of a 4×4 road located about 5 miles north of the entrance to Horseshoe Canyon. You simply turn north on Road 1010 as you exit the entrance road for Horseshoe Canyon and then make a right on the first signed road at the 5.2 mile mark. This short 3.5 mile road is very rough in spots with exposed rock sections. A 4×4 is definitely required (as a woman told me who I met at the trailhead, “Put some decent tires on your X5”). The trail leads north of the parking area out over a section of slickrock. It then follows an old road bed past a large wooden fence and continues northward for about .75 miles. The trail then veers eastward toward the Green River at a large cairned rock outcropping. The trail leads eastward for about .5 mile. The cairned route becomes hard to follow at points. The way leads steeply downward to a second level of slickrock (I had to clamber on hands and knees up a 10 foot section on the way back). Colonade Arch is then just around a bend to the left. The arch itself is impressive. It has four openings with a fifth being a pothole arch just in back of the main openings. Photos don’t do this place justice. The arches are quite large. I was impressed with this little known arch.
Lower San Rafael Swell, UT
Horseshoe Canyon, Canyonlands National Park, UT
Pictographs, Horseshoe Canyon, Canyonlands National Park, UT
Colonade Arch trail, Lower San Rafael Swell, UT
Colonade Arch, Lower San Rafael Swell, UT
Goblin Valley State Park
I next stopped at Goblin Valley State Park. I camped here and had fun walking around the large collection of hoodoos the park is known for. I hadn’t made it back to this place after my camera was stolen out of my car a couple of years ago at Crack Canyon. This time, thankfully, there was no drama. I took in a nice sunset and got up for sunrise the next morning. Unfortunately, I was met with rather hazy overcast so it was not too impressive. While I was at Goblin Valley, I did stop by Little Wild Horse Canyon. It is a very short hike through a nice slot canyon. It has two sections of narrows and the hike is easy. I love the swiss cheese rock that adorns the walls of this canyon.
I also stopped at the trail to Wild Horse Window. This is a challenging 1 mile hike. Located off the park road just past the junction with Temple Mountain Road, the trailhead for this hike is located at the end of a short dirt road. To get there, turn left onto to the Goblin Valley Road at the junction with the Temple Mountain Road. Go about .3 mile and turn down the short dirt road to your right. The hike then leads down a short trail into and out of the wash below. The trail then proceeds north, steeply up slickrock. There is no real trail from here. You just aim for what looks like a large cave directly to your north. Unfortunately, as you hike you lose sight of the cave pretty quickly. The route requires you to stay to your right to avoid the large canyon to your left. Then, you must veer a little more right to avoid a large rock outcropping to your left. If you find yourself in a sort of mini canyon with rock faces to either side, you’re in the right place. You will then cross a sandy area that again leads steeply upward. Hug the left wall here and you should be fine. You then pop out in the area where the Window arch is located. The arch looks from the outside like a pair of eyeglasses. It has a large pothole type arch is back of the main entrance. This indeed is a cool little arch.
Hoodoo, Goblin Valley State Park, UT
Temple Mountain sunrise, Goblin Valley State Park, UT
Little Wild Horse Canyon, UT
Wild Horse Window, Utah
Neon Canyon
That afternoon, I headed over the Burr Trail road in Capitol Reef National Park. Regrettably, the winds were gusting over 50 mph so I headed to my campsite for the night. In the morning, the winds eased and the skies cleared so I headed down to the Grand Staircase Escalante National Monument between the towns of Boulder and Escalante. I took the Hole in the Rock Road and prepared to do some more exploring of slot canyons. First, I stoped at Neon Canyon. This is located along the Escalante River in an area known as Out of Egypt. To get there, you have to negotiate a 10 mile long 4×4 road. To reach the trailhead, you turn left on the dirt road at mile marker 17 where a road is marked with a small sign “Out of Egypt.” No section of this side road is particularly hard, but caution is needed in several spots, including crossing a 200 foot section of slickrock at around the 7.5 mile mark. The road roughens from here until reaching the trailhead at its end. Once at the trailhead, you see what makes this hike challenging. You descend 500 feet in the first 1/2 mile down a steep section of slickrock. The route is marked by cairns but it still feels rather intimidating. After reaching the wilderness marker, you have a decision to make. You can either continue on the main trail which takes you around the very deep Fence Canyon and requires a backtrack of about 1.25 miles, or you can veer right onto an alternative path that takes you overland across the sand dunes and slickrock. The Fence Canyon route is easy to follow (there are cairns and hundreds of footprints) and eventually leads around the northeastern edge of Fence Canyon. Once you are at the bottom of the canyon, you turn right and head down the Escalante River drainage. You have to wade the Escalante River at least a couple of times in what will be calf to waist deep water depending on the time of year (it was not even up to my knees this April). You will pass a large camping area and then enter the river agin before coming to a longer section of trail that will access the mouth of Neon Canyon.
The alternate route has the virtue of being shorter but requires more navigation skills. The way is cairned in spots but the route can be difficult to find at times as well. After you veer right at the sign mentioned above, the route makes it way over a rocky area before ascending a large rock face. It then descends the face and veers sharply to the left. It then makes another turn to the right to head down a large sand dune. You are aiming for Choprock, a large rock outcropping with dark vertical stripes in it that guards the entrance to Neon Canyon (you can see the rock from the trailhead but will soon lose it off and on as you walk). A word of caution. If you are going to take this route, take it down but don’t take it back up. I make this mistake and you will pay for it. You have to ascend a 300 foot section of sand dune and then climb another few hundred feet to ascend that large rock butte I mentioned above. I also missed the sharp turn to the left and found myself staring into the steep abyss of Fence Canyon. Eventually, I backtracked and found the route back to the main trail. I then faced the grim reality of ascending the five hundred feet of slickrock at the end after an already tiring return trip.
So was all this effort worth it? You bet. Neon Canyon is amazing. The end of the trail is marked by the Golden Cathedral, two large holes in the striped canyon ceiling of Neon Canyon. Canyoneering experts actually repel through these holes on their way down Neon Canyon. I have never seen this done live, unfortunately, but it would be a sight to see. From the Escalante River, Neon Canyon itself is about a mile walk and it is a beaut. The reflected light makes the canyon walls glow a gorgeous shade of orange. The newly leafed cottonwood trees made this especially pretty in April.
Neon Canyon, Grand Staircase Escalante National Monument, UT
Golden Cathedral, Neon Canyon, Grand Staircase Escalante National Monument, UT
Harris Wash and Zebra Canyon
I have wanted to see Zebra Canyon for a number of years. Its striped walls draw hundreds of photographers every year and now I can see why. It is an exceptional place. Yet, I can’t help but think Harris Wash gets short shrift due to all the attention the slot canyon gets. Harris Wash itself contains some of the most fantastical rock formations I have seen. I loved exploring each bluff and butte, each one crazier than the next. Want weird rock formation and spires? Check. Wash crazy zigzag patterns in the rock? Check. Want bicolored rock? Check. Want striped rocks that disappear into the horizon? Check. I have to admit that if I ever go back to this area I will want to backpack to Harris Wash just to photograph more of these amazing rock formations.
Okay, now onto Zebra canyon. The hike takes you overland above the wash for about 1 mile. You then drop into the wash and the fun begins. You pass through a wooden gate in about .5 mile and quickly come to the mouth of the side canyon as it drains into Harris Wash. The wash is amazingly wide and could be a river if it were perpetual. Luckily, the wash is dry except during thunderstorms. Cross the wash and veer left at a 45 degree angle. Follow the trail of footprints to the mouth of Zebra Canyon. In spring the mouth will likely be dry as it was for me but after rains, the mouth will be full of water, even into early winter. So come prepared for any conditions. The biggest challenge is now squeezing through the canyon to see the good stuff. The narrows are only about .5 mile long but are extremely narrow. Bring elbow and knee pads. I have scrapes all along my knees and elbows to prove the point. Shimmying up the canyon walls is the only way to get through. But the narrows are amazing. The color and patterns are striking. The walls are striped and the curves look like they have been expertly sculpted. Nature is truly artistic.
Harris Wash, Grand Staircase Escalante National Monument, UT
Zebra Canyon, Harris Wash, Grand Staircase Escalante National Monument, UT
Harris Wash, Grand Staircase Escalante National Monument, UT
Dance Hall Rock and Hole in the Rock Road
Located toward the end of Hole in the Rock Road (at mile 37) one finds Dance Hall Rock. It is a seemingly nondescript stop with a small parking area but don’t be fooled. The area is worth a visit. First, the name is misleading. It is not one rock but many large sandstone mounds, each about 50 feet high. Once on top of the rocks, things get interesting, The rocks contain potholes which can make for some really unique photography. Several have trees growing out of them. The problem of course is contrast. Unless you shoot the rocks at midday, the potholes will be encased in shadow. I liked shooting a couple of hours before sunset, so the rocks had a nice glow to them but shadows weren’t too bad yet. Be prepared for more than a short walk as well. The mounds extend for about a mile. I also found staring down into large potholes while on top of a 50 foot tall rock to be disorienting. Hopefully, the winds will be calmer than when I was there.
I also stoped at the parking area for Upper Dry Fork. The Lower Dry Fork is famous for its easy access to Peek-a-Boo and Spooky slot canyons. The Upper lot also can access those canyons but with a longer walk. Instead, I walked the Rim trail here looking for cool shots near sunset. The trail gives you a nice overview of the rock formations that can be found in the Upper Dry Fork canyon. A stroll through the canyon would also be productive, given the open nature of the canyon before it enters a section of narrows after 1.5 miles or so of hiking. The only downside to these hikes is having to drive Hole in the Rock Road which might as well be dubbed Hole in the Tire Road. It is a long, dusty and very bumpy road. The washboard on this road is terrible after about mile 20. It was not a pleasurable experience driving the last 15 miles or so to Dance Hall Rock. 4×4 is not required for this section of road but tough tires would sure be a comfort.
Dance Hall Rock, Hole in the Rock Road, Grand Staircase Escalante National Monument, UT
Metate Arch, Devil’s Garden, Grand Staircase Escalante National Monument, UT
Devil’s Garden, Grand Staircase Escalante National Monument, UT
Upper Dry Fork, Rim trail, Grand Staircase Escalante National Monument
Devil’s Garden, Grand Staircase Escalante National Monument, UT, stars, astrophotography
I took a quick jaunt to the Moab area this past weekend. Out here in the West, March comes in like a lamb and goes out like a lion so the first week of March is a perfect time to camp and do some hiking in the redrock country of Utah. I visited Arches National Park and Canyonlands National Park. I also took a quick hike through Kane Creek near the Colorado River behind Moab.
I took in the sunrise at Broken Arch in Arches and was treated to a beautiful show. The arch glows a lovely golden color at sunrise. I then took the quick side trip to Sand Dune Arch. It is a cool arch but hard to photograph well given the towering sandstone fins surrounding it.
I then hiked over to Landscape Arch and Pine Tree Arch in the nearby Devil’s Garden area. Pine Tree Arch lakes for a cool shot in the morning as the light hits the pine trees growing inside of it.
In the afternoon, I hiked to Corona Arch which is located just outside the park along the Potash Road. It is a short 1.5 mile hike to a very large almost free-standing arch. I always like this hike since you get to climb a rope ladder and scurry along a steel cable to get up to the arch. I stopped and photographed Bowtie Arch which is a cool pothole arch just before reaching Corona Arch itself.
I ended the day with a quick hike to Poison Spider Mesa. I had never been to this area before and it looks like it would be worth returning to the area. It is full of huge petrified dunes or large sandstone knobs that would make for some interesting compositions. There is also a great view of the LaSal Mountains and the Behind the Rocks area. Although it is a rough road that is frequented by ATVers (all too common in Moab now), the hike is a steep but pleasant enough one up the road. It is about 1.5-2 miles to the mesa.
The last day of the trip I spent in Canyonlands National Park. I went to Aztec Butte and checked out the ruins up along the cliffs of the buttes. It was worth the steep hike up the side of the butte. The view from atop the butte is stunning. The ruins are cool but unfortunately the famous one behind a little arch has fallen down and been remade into a boring wall. I ended the afternoon with a trip to Grand View Point to check out the view at sunset.
Sony 12-24 f2.8 Lens
I rented a Sony 12-24 f2.8 lens for the trip and it performed spectacularly well. There often aren’t uses for 12mm lenses outside of the realm of architectural photography, so it was fun to put this lens to the test underneath a few giant arches. The lens is extremely sharp and only shows signs of decreasing sharpness in the extreme corners. It is a heavy lens but is lighter than the monstrous Canon 11-24 f 4 lens and is 1 stop brighter. The Sony lens shows little chromatic aberration and is a very good lens for astrophotography and landscape photography. It does suffer from some flaring even without the sun in the frame so I had to be careful at certain angles. Overall, this lens performed very admirably and is something that should make it into many Sony photographers’ bags.
Broken Arch, Arches National Park, UT
Landscape Arch, Arches National Park, UT
Sand Dune Arch, Arches National Park, UT
Pine Tree Arch Arches National Park, UT
North Window Arch, Arches National Park, UT
Turret Arch, Arches National Park, UT
Corona Arch trail, Moab, UT
Bowtie Arch, Moab, UT
Cairns, Corona Arch trail, Moab, UT
Kane Creek, Moab, UT
Aztec Butte ruins, Canyonlands National Park, UT
Panorama, Grand View Point, Canyonlands National Park, UT
Stars, Double Arch, Arches National Park, UT
View of Behind the Rocks and Lasal Mountains from Poison Spider Mesa, Moab, UT
For a while now I’ve been meaning to do a series of black and white photographs of the Southwest. I’ve made a few trips to the National Parks of Utah recently with this in mind . This series has photographs from Arches, Capitol Reef and Canyonlands National Parks, and Valley of the Fire State Park. In particular, I tried to find images that featured trees. Many of the trees in these parks are old or dead. Their twisted and gnarled shapes make for some wonderful compositions. Perhaps my favorite trail was the Navajo Knobs trail in Capitol Reef. This trail has volcanic rock and a plethora of dead junipers that make for perfect black and white compositions.
Black and White Conversion Process
I like to create contrasty black and white images to highlight these features. I start with a color digital file. I use the high contrast red filter in Photoshop to achieve this effect. I start with the presets of the filter and then adjust the individual color levels accordingly. I often lower the yellow percentage just a little and lower the Cyan and Blue levels even more to darken the sky.
Fruita Barn, Capitol Reef National Park, UT
Navajo Knobs trail, Capitol Reef National Park, UT
Capitol Reef National Park, UT
Navajo Knobs trail, Capitol Reef National Park, UT
Little Finland, Lake Mead, NV
Snow Canyon, UT
Snow Canyon, UT
Arch, Rainbow Vista, Valley of the Fire State Park, NV