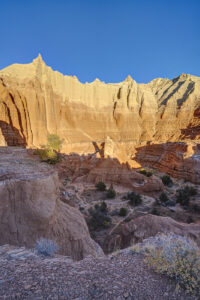
I visited Kodachrome Basin State Park near Cannonville, UT on my recent trip to southern Utah. I had been there once before but the weather let me down. This time it was perfect. I went to Chimney Rock, Ballerina Spire, and Angel’s Place. Kodachrome features some pretty reddish sandstone spires so it was a the perfect place to be near sunset to watch the rock glow red.
Tag: desert Southwest
-

White Pocket 2023
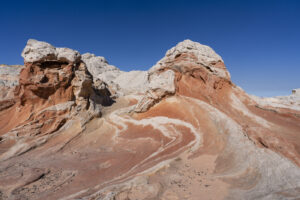
I first went to White Pocket in 2012. It was a surreal experience as the swirls in the rock formation s defy explanation. I had a chance to go back this week and was not disappointed. While White Pocket has surged in popularity (as have many things in the desert southwest), it is still a place worthy of a visit. Although I would have loved to have spent the night and photographed in the -golden hour and at night, a day tour was all I could muster. It still is a magical place, even at midday. A young woman on our tour from Ho Chi Minh City even posed in a red dress for me. All in all, it was a beautiful day.
-

Arches Black and White
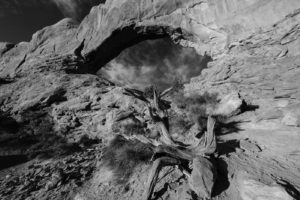
I took a trip out to Arches and Canyonlands National Parks recently. While I was there, I focused on subjects that might make for some interesting black and white compositions. I always look for dead trees, interesting lines, or areas of stark contrast. These often make great black and white images. I also like shooting black and whites outside the golden hours since the sky tends to turn a dark blue and will render as black. Arches National Park and the area surrounding Moab, UT is a great place to find such subjects.
The Windows area in Arches has plenty of good subject matter. Arches, dead trees, and other natural features abound. I also spent some time hiking the Corona Arch trail and the area around Aztec Butte in Canyonlands National Park.
-

Arches and Moab
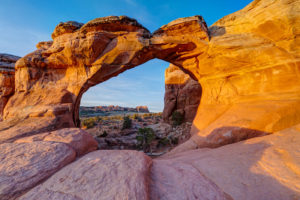
I took a quick jaunt to the Moab area this past weekend. Out here in the West, March comes in like a lamb and goes out like a lion so the first week of March is a perfect time to camp and do some hiking in the redrock country of Utah. I visited Arches National Park and Canyonlands National Park. I also took a quick hike through Kane Creek near the Colorado River behind Moab.
I took in the sunrise at Broken Arch in Arches and was treated to a beautiful show. The arch glows a lovely golden color at sunrise. I then took the quick side trip to Sand Dune Arch. It is a cool arch but hard to photograph well given the towering sandstone fins surrounding it.
I then hiked over to Landscape Arch and Pine Tree Arch in the nearby Devil’s Garden area. Pine Tree Arch lakes for a cool shot in the morning as the light hits the pine trees growing inside of it.
In the afternoon, I hiked to Corona Arch which is located just outside the park along the Potash Road. It is a short 1.5 mile hike to a very large almost free-standing arch. I always like this hike since you get to climb a rope ladder and scurry along a steel cable to get up to the arch. I stopped and photographed Bowtie Arch which is a cool pothole arch just before reaching Corona Arch itself.
I ended the day with a quick hike to Poison Spider Mesa. I had never been to this area before and it looks like it would be worth returning to the area. It is full of huge petrified dunes or large sandstone knobs that would make for some interesting compositions. There is also a great view of the LaSal Mountains and the Behind the Rocks area. Although it is a rough road that is frequented by ATVers (all too common in Moab now), the hike is a steep but pleasant enough one up the road. It is about 1.5-2 miles to the mesa.
The last day of the trip I spent in Canyonlands National Park. I went to Aztec Butte and checked out the ruins up along the cliffs of the buttes. It was worth the steep hike up the side of the butte. The view from atop the butte is stunning. The ruins are cool but unfortunately the famous one behind a little arch has fallen down and been remade into a boring wall. I ended the afternoon with a trip to Grand View Point to check out the view at sunset.
Sony 12-24 f2.8 Lens
I rented a Sony 12-24 f2.8 lens for the trip and it performed spectacularly well. There often aren’t uses for 12mm lenses outside of the realm of architectural photography, so it was fun to put this lens to the test underneath a few giant arches. The lens is extremely sharp and only shows signs of decreasing sharpness in the extreme corners. It is a heavy lens but is lighter than the monstrous Canon 11-24 f 4 lens and is 1 stop brighter. The Sony lens shows little chromatic aberration and is a very good lens for astrophotography and landscape photography. It does suffer from some flaring even without the sun in the frame so I had to be careful at certain angles. Overall, this lens performed very admirably and is something that should make it into many Sony photographers’ bags.
-
Valley of the Fire State Park
Valley of the Fire State Park in northern Nevada is a photographer’s dream. Â It contains countless rock formations of eroded sandstone such as arches, rock fins, and multi-colored rock. Â The park consists of four main areas: the Main Park Drive, the Loop Road, the Silica Dome Road, and Highway 169.
Loop Drive
The loop drive contains a number of small rock formations and arches that make for some very cool photography. Â While the area has a handful of iconic formations such as Arch Rock, Piano Rock, and Windstone Arch, a creative photographer can come up with countless images due to the interesting geology of the area. Â The are hundreds of little pockets carved into the rocks here and reflected light into them makes for orange-colored rock.
Arch Rock
Arch Rock is a small arch located at the top of a rock as the name implies. Â It is found just past Arch Rock campground. Â It is best photographed an hour or so before sunset so the arch has some light on it.
Piano Rock
Piano Rock is a rock shaped like a grand piano and is found on the left side of the road just as the road makes a turn toward Arch Rock campground.
Windstone Arch
Winston Arch is a little arch or rock leg found inside a small alcove. Â It is best photographed in mid morning when reflected light makes the interior glow orange. Â There is a small turnout about 200 yards from the junction with Highway 169. Â Park here and go around the back of the first large rock formation. The alcove is straight ahead in a second set of small rock formations. Â This whole area is very photogenic so don’t just focus on Windstone Arch.
Main Park Drive
Petroglyph Trail
This 3/4 mile long trail contains several large panels of petroglyphs carved into the rock face on the left side of the canyon as you descend. Â It is an easy walk through a sandy canyon. Â Mid afternoon works best for photos.
Rainbow Vista/Fire Canyon
This trail leads to two overlooks: one of Fire Canyon and its brown-colored chunks of volcanic rock and Rainbow Vista, an amazing, colorful plateau with a commanding view of the park. Â If you take the main trail straight form the parking lot and then veer right upon arriving at a steep rock face, you will arrive at Fire Canyon overlook in about 1 mile. Â A small arch can be found near the end of the trail. Â As you walk back toward the parking lot, stop at the area of pink and yellow sandstone where the trail veered steeply to the right. Â If you ascend 100 feet or so above this area, you will find views opening up. Â Proceed to the left and then out onto to the rocks. Â This is Rainbow Vista. Here is where you will find amazing small arches and an incredible view of Silica Dome. Â This may be the most photogenic spot in the park.
Parking Lot #2
Pink Canyon
Pink Canyon is a short slot canyon just off the main park road. Â It lies directly between parking lot #2 and #3. Â There is one parking spot on either side of the road at the canyon entrance that seems to be an informal parking area for the canyon. Â If these spaces are full, it is about a .6 mile hike back to one of the parking areas up a steep hill so be prepared. Â The hike itself is quite short through the slot canyon. Â The sculpted walls make for some interesting photography. Â Be prepared to use HDR or a graduated neutral density filter to keep the sky from blowing out. Â Don’t forget to scramble up one of the rock faces and do a little exploring. Â This is possible where the canyon makes a sharp left turn. Â The area up top contains some beautiful rock fins.
Swoosh Rock
Swoosh Rock is named for the streak of red rock that adorns the base of the formation, and looks like the symbol of a famous shoe company. Â The rock itself is mainly pink and yellow sandstone. Â This rock is located just across from the mouth of Pink Canyon. Â As you cross the road from the canyon, veer to the right and stay close to the road. You will find it in about 100-200 feet.
Rock Fins
If you head out on a route at about 2 o’clock form parking lot #2, you will come to some incredible rock fins. Â There is no trail so you have to pick your way across the sandstone. Â Be careful as the area is criss-crossed by large canyons so route-finding skills are required. Â This is not an area to blindly wander in the dark for sure. Â My favorite spot was an area of sandstone that looked like it had been melted like candy and then curled under. Â The rock fins make for great leading lines in a photograph as well.
Parking Lot #3
Crazy Hill
Crazy Hill is a name that does;t do the formation justice. Â Painter’s Palette might be a better name as it looks as though a painter spilled several paint buckets on the rock and let the colors run down the side of the rock. Â It is found by walking straight out of the parking lot #3 a couple hundred yards. Â You follow the mouth of a small canyon and continue heading straight down the hill. Â You will see a couple of small arches along the way in the sides of the rock.
Fire Wave
The Fire Wave is the park’s iconic formation. The name comes from its resemblance to the more famous Wave formation in North Coyote Buttes, AZ. Â A better name for it might be Ribbon Candy Rock as it consists of stripes of red and white rock swirled into a bizarre ribbon-like shape. Â A new trail leading out to Fire Wave has been built by the park in recent years that leads from parking lot #3. Â It is about 1/2 mile to the Fire Wave. Â This trail is popular so park here well before sunset if you want a parking spot. Â Like all popular photo stops these days, be prepared for large crowds during the golden hour.
White Domes Loop
Silica Dome
Getting There
Take Exit 75 on I-15 heading north from Las Vegas onto Highway 169 heading east. Â The entrance to the park will be about 13 miles ahead. Â The first thing of note will be the Loop Drive and the campgrounds. Â If you are coming from the north, you can also access the park from exit 93, as Highway 169 loops back to I-15. Â This way takes a little longer as the road goes through two small towns.
Camping and Accommodations
The two campgrounds are first come/first serve. Â Get there by 10 am to ensure a spot. Â The park campgrounds usually fill during the temperate moths of fall and spring.
-
Little Finland
I visited an area in Lake Mead, Nevada known as Little Finland over Thanksgiving break. Â It is a small plateau that contains some incredibly bizarre and delicate sandstone formations. Â The formations make for some interesting photography subjects near dawn or dusk. Â The rock is uniform in color so it is not as interesting as the Coyote Buttes area to the northwest, but the rocks themselves are photogenic. The sandstone has eroded into very delicate fins, box work, and pock-marked canyon faces. Â There are also many crevices and small caves reminiscent of Valley of the Fire.
The area of Little Finland is small enough to explore in a couple of hours. Â But careful exploration will take longer. Â Keep an eye out for petroglyphs while you explore.
The plateau Little Finland is located on contains three separate little canyons. Â Some you can explore all the way to the top while others are too steep and require more navigation. Â The far left and far right canyons provide the easiest access up and down the entire plateau. Â Some of my favorite rocks were toward the top of the left branch of the canyon. Â The entire face looked like Swiss cheese.
Photography tips
The coolest formations are toward the base of the plateau. Â This means they will not be in sun near sunset or sunrise. Â Take silhouettes here. The top of the canyon will be the first and last part to get light. Â The top part of the canyon has more little arches and alcoves to photograph.
Little Finland would be fantastic for star photography but access to the plateau is difficult in the dark.  The terrain is very uneven and the rock is very sharp!  I cut my finger on one rock and sliced a hole in my coat on another. So astrophotographers beware!  Bring lots of light to get to and from the plateau in the dark.
Getting There
The trip to Little Finland requires a lengthy drive across bumpy dirt roads and even an excursion through a wash so an AWD drive vehicle with some clearance is necessary to reach it. Â We did it in a BMW X3 so most AWD vehicles will be fine. Â It takes about 1:45 minutes from I-15 to reach Little Finland. Â Take exit 113 (Hwy 170) off of I-15 and go about 3 miles east, just crossing the Virgin River. Â Then turn right (south) onto Gold Butte Road toward Whitney Pockets. Â This road is “paved” but often the surface is missing. Â Drive about 28 miles south on the road until reaching Whitney Pockets. Â The dirt road forks and take the fork toward Gold Butte. Â Drive 6 miles or so (passing the first sign for Mud Wash)Â before seeing a right turn onto a narrow dirt road marked Devil’s Throat. Â Stay right at the fork and head down to Mud Wash. Â You will reach Mud Wash in about 3 miles after taking this right turn. Â Once in the wash, just follow tire tracks down the wash. Â You will reach an old corral on the right in about 2 miles. Â Continue past the corral and watch for a road making a sharp turn to the right in about 2 miles. Â Follow this road for a mile and a half or so as it doubles back and parallels Mud Wash. Â Drive until you see a fence line on your left and some palm trees along the base of the plateau. Â This is Little Finland.
Accessing the plateau is a little tricky.  A steep cliff guards the main rim so access is from either the left or right side.  The near entrance is the easiest access.  Park in the wash and walk up a small incline to the fence line just to the left of the palm trees.  There is a small entrance in the fence, and once through it, you are free to explore the plateau to the right.  You can also access the plateau via a second entrance a few hundred yards past this one.  Drive around a small hillside just 200 yards further down the wash.  Park here and you will see a second fence line above you.  After walking through a gate in the fence, turn right and walk along a small wash for about 200 feet.  You will see the hillside on the left sloping downward  toward you.  Turn left at this point and head up onto the plateau.  At this point, most of the best formations are just to your left.
To catch first and last light on the rocks, I recommend camping along the wash. Â There are several flat areas along the base of the Little Finland plateau. Â Â I would not recommend leaving the area near dusk as driving the wash in the dark would be hazardous.
