Tag: landscape photography

  • Zion area

    Zion area

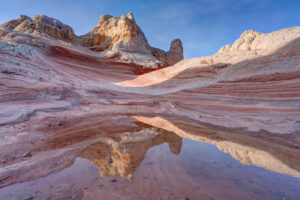
    I traveled to southern Utah near Zion National Park. My two big stops were the Subway hike in Zion and White Pocket in the Paria/Vermillion Cliffs Wilderness.

    The Subway

    I had made one prior attempt to hike the Subway in Zion but never made it past the waterfall you have to hike over. This time I came prepared with water shoes. The hike starts off the Kolob Reservoir Road about 13 miles from the visitor center. I picked up my permit and headed to the trailhead. The first part of the hike meanders through junipers and then descends steeply (400 ft.) to the canyon floor around the 1.5 mile mark. The trail then skirts the creek for the next couple of miles, crossing it several times. There are a few areas where the trial climbs over boulders and trees. In April, the water wasn’t too high so this was not much of an issue. At mile 3, I reached a large, stepped waterfall with huge boulders in the creek. The only way to keep going is to walk through the water up the waterfall. The stair steps are relatively easy to climb so this was not much of an issue. But watershoes are helpful here since the water can be six inches deep in places. In about a half mile, I came to another stepped cascade. This one is a beautiful spot for some photography. This falls can be negotiated by walking around to the right of it. Just above this fall, is the famous crack where water flows through like a train track. It makes for some cool photos but the rock is incredibly slippery here so beware. The Subway is just a couple hundred yards around the bend from this area. The Subway itself has some amazing sculpted pools and the curved rock that forms the Subway. I was lucky enough to have a couple of large tree branches sticking out of the pools to create some cool looks. The trail continues up some small riffles (very slick) to where it reaches hip deep pools. Just beyond is a little waterfall that I did not see. Little too cold in April to trudge through the pools. The famous tree log is one level higher, but I would have needed a 15 ft rope to ascend the falls to get there.

    White Pocket

    The next stop I made was at White Pocket. It is located just south of Big Water, UT but to reach the area requires about 1.5 hours of backroad travel on 4-wheel roads. I went with an outfitter to avoid getting stuck in the sand along the way. I camped out to try and take advantage of the golden hour and overnight but clouds ruined my plan. Sunset and overnight were a bust. I did get some nice light in the morning so here are a few photographs of the very bizarre White Pocket area. The area gets its name from the holes or “pockets” in the rock that trap rain water. There was a little water in some of them so I was able to capture a couple of reflections. I also hiked to some of the more remote formations that torus don’t stop at. One was reminiscent of South Coyote Buttes with lots of sandstone fins. Very cool.

  • Grand Teton and Yellowstone

    Grand Teton and Yellowstone

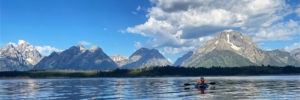
    After backpacking to Alaska Basin, my wife and I spent a couple of days in Grand Teton National Park and Yellowstone National Park. With not a lot of time to spend, we hit some of the highlights of each park. We kayaked in Jackson Lake, took in the sunrise at Oxbow Bend, and then headed to Yellowstone. We caught the eruption of Old Faithful and toured around the Grand Prismatic Pool area. I really liked Firehole Falls at the beginning of the Firehole River canyon. The best was yet to come, however. I found a huge field of wildflowers near the shore of Yellowstone Lake and then we caught the sunset at Gull Point along the lake. What color! In the morning, we made our way out of the park to pick up our son at Buffalo Bill Boy Scout camp. There were more fields of flowers just before Sylvan Lake. The yellow was quite a contrast with the stark tree poles killed by forest fires in the area. Unfortunately, there was not much wildlife to be spotted. Only the occasional bison and elk. I think the heat had many animals hiding up high.

  • Arches Black and White

    Arches Black and White

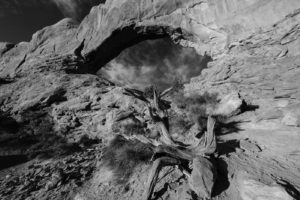
    I took a trip out to Arches and Canyonlands National Parks recently. While I was there, I focused on subjects that might make for some interesting black and white compositions. I always look for dead trees, interesting lines, or areas of stark contrast. These often make great black and white images. I also like shooting black and whites outside the golden hours since the sky tends to turn a dark blue and will render as black. Arches National Park and the area surrounding Moab, UT is a great place to find such subjects.

    The Windows area in Arches has plenty of good subject matter. Arches, dead trees, and other natural features abound. I also spent some time hiking the Corona Arch trail and the area around Aztec Butte in Canyonlands National Park.

  • Arches and Moab

    Arches and Moab

    I took a quick jaunt to the Moab area this past weekend. Out here in the West, March comes in like a lamb and goes out like a lion so the first week of March is a perfect time to camp and do some hiking in the redrock country of Utah. I visited Arches National Park and Canyonlands National Park. I also took a quick hike through Kane Creek near the Colorado River behind Moab.

    I took in the sunrise at Broken Arch in Arches and was treated to a beautiful show. The arch glows a lovely golden color at sunrise. I then took the quick side trip to Sand Dune Arch. It is a cool arch but hard to photograph well given the towering sandstone fins surrounding it.

    I then hiked over to Landscape Arch and Pine Tree Arch in the nearby Devil’s Garden area. Pine Tree Arch lakes for a cool shot in the morning as the light hits the pine trees growing inside of it.

    In the afternoon, I hiked to Corona Arch which is located just outside the park along the Potash Road. It is a short 1.5 mile hike to a very large almost free-standing arch. I always like this hike since you get to climb a rope ladder and scurry along a steel cable to get up to the arch. I stopped and photographed Bowtie Arch which is a cool pothole arch just before reaching Corona Arch itself.

    I ended the day with a quick hike to Poison Spider Mesa. I had never been to this area before and it looks like it would be worth returning to the area. It is full of huge petrified dunes or large sandstone knobs that would make for some interesting compositions. There is also a great view of the LaSal Mountains and the Behind the Rocks area. Although it is a rough road that is frequented by ATVers (all too common in Moab now), the hike is a steep but pleasant enough one up the road. It is about 1.5-2 miles to the mesa.

    The last day of the trip I spent in Canyonlands National Park. I went to Aztec Butte and checked out the ruins up along the cliffs of the buttes. It was worth the steep hike up the side of the butte. The view from atop the butte is stunning. The ruins are cool but unfortunately the famous one behind a little arch has fallen down and been remade into a boring wall. I ended the afternoon with a trip to Grand View Point to check out the view at sunset.

    Sony 12-24 f2.8 Lens

    I rented a Sony 12-24 f2.8 lens for the trip and it performed spectacularly well. There often aren’t uses for 12mm lenses outside of the realm of architectural photography, so it was fun to put this lens to the test underneath a few giant arches. The lens is extremely sharp and only shows signs of decreasing sharpness in the extreme corners. It is a heavy lens but is lighter than the monstrous Canon 11-24 f 4 lens and is 1 stop brighter. The Sony lens shows little chromatic aberration and is a very good lens for astrophotography and landscape photography. It does suffer from some flaring even without the sun in the frame so I had to be careful at certain angles. Overall, this lens performed very admirably and is something that should make it into many Sony photographers’ bags.

  • Colorado Fall Color 2019

    I spent 4 days in the Colorado high country last week. The aspen were at peak or just beginning to turn in some places. Grand Mesa and Boreas Pass were the best spots to catch fall color.

    Aspen

    Maroon Bells had some nice aspen but the area was not at peak yet. The water in Maroon Lake was unusually low so it made for bad reflection photos. I did get to see a beautiful sunrise at the start of the Capitol Peak trail.

    Grand Mesa

    I found a couple of nice spots to see fall color on the Grand Mesa near Grand Junction, CO. The best seemed to be around Lake.

    Boreas Pass

    The aspen were turning near peak color last weekend on Boreas Pass near Breckenridge.


    Flattops

    I took a drove through the flattops. While the aspen had not yet turned, the scrub oak were amazingly vibrant.

  • Alice Lake/Toxaway Lake Loop Hike

    I’ve had the Alice Lake/Toxaway Lake loop hike in the Sawtooth mountains of Idaho on my bucket list for a number of years now. I finally got to do the hike this past week.  It was well worth the wait. My son and I spent three days in the wilderness here. The hike has any number of features a photographer could want–beautiful alpine lakes, gorgeous waterfalls, and some midsummer wildflowers.  It also has a number of lakes stocked with brook trout. The trail is located about 20 miles from Stanley Idaho or 50 miles north of Sun Valley. 

    Trail Description

    The trailhead starts near the Petit Lake campground. In about 1/4 mile, the trail splits–go straight to Alice Lake or veer right to Toxaway Lake. I choose the Alice Lake route because the Toxaway trail can be steeper in portions going in the uphill direction. The Alice Lake trail is fairly benign for its first 3 miles. Not too bad for carrying a 40 pound pack.  Around mile 2.5, you come to the first of 6 stream crossings. The crossings either have to be waded or you can look for logs that have been placed across the stream by other hikers.  In July, the stream crossings weren’t too bad and we found logs just upstream from the main crossings in all cases. After the second stream crossing, the fun begins.  The trail climbs steeply above the creek and switchbacks up the hillside. The trail goes through a rocky section and features a few nice fields of Mariposa lilies. Up in Idaho, these flowers are white with purple centers as opposed to green ones found in Colorado. The trail continues to zig zag through the forest and finally comes to a bridge at crossing number 5.  The last crossing brings you across the lake outlet and to your probable destination for the night–Alice Lake.  Alice Lake has a number of good camping sites along its shoreline that borders the trail.  Two arms jut out into the lake each of which has several camping spots.  The second makes for a great spot to shoot the sunrise from.  At least 4 peaks surround the far side of the lake and light up a brilliant orange at sunrise and are reflected in the calm waters of this part of the lake.  Alice Lake has a decent fishing for brook trout although it is shallow in many spots (great for reflection photography but not so good for growing big trout). 

    If you follow the shoreline of Alice Lake to the end of the lake off trail, there is a small creek emptying in to the lake.  There are some spots to get good waterfall photos here. Backtracking to about mid lake to rejoin the trail, the trail begins to climb high towards Twin Lakes.  This pair of lakes lies about 1 mile farther up from Alice Lake.  The trail continues up to the pass or drops about 100 feet to the lakes to the left. You can also camp here if you choose.  It is not quite as scenic as Alice Lake but is beautiful nonetheless.  Twin Lakes also sports much better trout fishing than Alice Lake. Above Twin Lakes, the trail climbs steeply up to the pass. From the top of the pass, you get commanding views of the Twin Lakes basin as well as the Toxaway Lake basin. Savor the view here before descending steeply to a couple of unnamed lakes just below the pass.  We stopped for lunch along the shore of the larger of the two lakes.  Below this lake, the trail passes by the creek which descends over the light colored granite in a series of cascades.  These made for some gorgeous waterfall photos. The trail crosses the creek just below one of the large falls and skirts the opposite short of Toxaway Lake. My advice is to continue just past Toxaway to camp. there is also a good site just before the waterfall above the lake.   The trail veers about 1/2 mile above the shoreline for much of the lake. The terrain is also rocky and steep.  There are a few camp sites off a spur trail below the junction with the Edna Lake trail. This leads to an arm that juts out into Toxaway Lake about halfway around the lake that contains a few camping spots.  We did camp here, but the walk back to the main trail was long and the mosquitoes were awful here. The worst I have seen outside of Alaska. 

    Below Toxaway Lake, the trail passes a couple of small tarns and the pretty Bowknot Lake. There is a large cascade at the back of one of the tarns but it was difficult to reach.  I had to hop logs and negotiate a large marsh to reach the falls.  It was pretty but harder to get to than it looked. From Bowknot, the trail descends steeply through a rocky boulder field and avalanche zone as it makes its way to Farley Lake. The trail passes by a large waterfall just past the boulder field.  A short spur trail brings you to the base of the waterfall but several large bushes block the view from being better than it is. Back on the main trail, you will pass a large field of wildflowers before reaching a view of Farley Lake. The trail is a good 1/4 mile from the shore, so while people do camp here, it is an effort to reach the sites. 

    The trail once again descends rapidly for the next couple of miles before coming to the last major obstacle–a crossing of the creek.  This one wasn’t logged, so we had to deboot and wade. It was rather easy but a minor inconvenience still. After another mile of walking the flats along the creek, you come to a junction with the spur to return to Petit Lake. After 17.5 miles of hiking, here’s the bummer with hiking the trail in this direction–you have to ascend the mountain 500 feet to the right and then descend it 500 feet to reach Petit Lake. It was the last thing I wanted to do on a hot afternoon, but I grudgingly made it up and over the small mountain.  Two long series of switchbacks get you up the mountain.  The descent is even steeper going down to Petit Lake so maybe I wasn’t so disgruntled with my choice of going to Alice Lake first. At long last, we reached the shores of Petit Lake at the end of our three days in the Sawtooth Recreation Area. 

    One word of caution: don’t expect to be able to get a spot in a campground in the Sawtooth Recreation Area without a reservation well in advance of your trip.  Reports were that Redfish Lake fills in January and we did not find a spot in the campgrounds around Petit or Altura Lake either. All hope is not lost, however, as there are several dispersed camping spots in the area, including several along the Salmon River. 

    Getting There

    Petit Lake is located 17 miles south of Stanley off of Highway 75. It is about a two-hour drive from Twin Falls, Idaho.  The trailhead is found the end of the campground.  There is a large parking lot to accommodate the growing number of hikers on this trail. You will need to fill out a free permit at the wilderness boundary to hike here (and yes a ranger checked my permit on day 3 so do stop to fill out one). 

  • Gap Lakes

    I backpacked to the Gap Lakes in the Snowy Range of Wyoming just before the eclipse.  This is a pretty area with several small lakes and tarns just a short distance form the trailhead.  I camped near South Gap Lake and explored some tarns around the area.  There are many small ponds with beautiful reflections to photograph in this area.  Lewis Lake at the trailhead is perhaps the prettiest of all the lakes.  I will have to return to this area to do some fishing.  

    Getting There

    The trailhead to the Gap Lakes is located at the Libby Lake and Lewis Lake picnic ground which is about a half a mile from the summit of the Snowy Range road. Proceed west out of Laramie, Wyoming for about 30 miles on the Snowy Range Road to reach this area.  The trail itself climbs about two hundred feet in elevation from Lewis Lake and arrives at the Gap Lakes in less than a mile.  You can explore the trial further to reach Deep Lake and other lakes in the region or take a different trail to reach Mirror Lake to the West.  

  • Total Eclipse

    I drove up near Laramie Peak in the Medicine Bow National Forest to view the total solar eclipse.  This national forest area offers a large area for dispersed camping so it was very popular with eclipse watchers.  It was fun to experience the event with thousands of other campers.  I also hiked most of Laramie Peak which was a good hike.  We had a beautiful clear day to view the eclipse.  I had never experienced a total eclipse before so it was an amazing event.  

    To shoot the eclipse, I used a Canon 100-400 lens.  I set my ISO at 800 and f-stop at 7.1.  I took shots about every 10 minutes.  I bracketed my exposures by setting auto bracketing to 5 steps (-2, -1, 0, +1, +2).  When totality hit, it was a crazy scene.  People started cheering as it got dark.  I shot a wide angle exposure of the area around the peak and then as I was taking the solar filter off of my zoom the sun came back out.  So I missed the shot of totality.  Oh well.  90 seconds goes by faster than you think.  It was still amazing to see.  

    Then the world’s largest traffic jam happened.  I waited 4 hours just to get out of Glendo.  Maybe the DOT should’ve opened north and southbound lanes to go south.  It took 6 hours to drive back to Denver.  Truly mind boggling to think more people came out to watch an eclipse than for any rock concert or sporting event.  

  • Winter in Canyonlands National Park

    My son and I recently spent a couple of days in Canyonlands National Park–one in the Island in the Sky District and one in the Needles section.  I like visiting Utah and Canyonlands in the winter because the skies are often clear and the crowds are thinned out and the Parks less busy.  On the first evening, we took in sunset at Green River overlook and then headed to Mesa Arch to shoot some star trails.  Since we were the only ones at Mesa Arch, it gave a completely different feeling than the normal sunrise time where 20 or more photographers jockey for position under the arch.  On the second day, we headed to the Needles.  Unlike Arches, the Needles is virtually deserted in the winter.  The rangers don’t collect fees and the visitor’s center is closed.  Not surprisingly, there were only a handful of cars in the park.  We hiked the trail to Druid Arch through the Needles area.  We got a late start and didn’t quite make it to the arch, but the hike along the trail provided some great photo ops.  Much of the Druid Arch trail winds along a wash and is lined with many dead junipers.  I took a bunch of photos in hopes of getting a few good ones to convert to black and white.  On the way back, we were treated to golden light on the rock formations.  I stopped at Pothole Point to catch the last rays of the sun on the canyon walls in the distance. The point provides just enough elevation to get above the junipers and give a clear view.     


  • Fiery Furnace

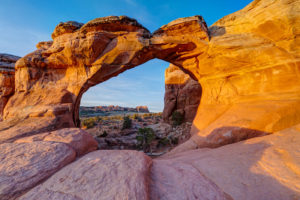
    I took my son to Arches over Christmas break.  We decided to hike in the Fiery Furnace area.  The Fiery Furnace is a fun place to hike.  There are no formal trails so ability to route find is a must.  As a result, the park requires a permit to hike there.  You can also do ranger-guided hikes the other three seasons.  Unfortunately, winter is not one of them.  

    The Fiery Furnace is a series of rock fins that contains arches, towering rock spires, and endless side canyons.  Because of the narrow canyons, mid day is best for photography so light gets into the canyons. The washes also contain a number of interesting trees to photograph.   

    Hike Description

    There are two basic routes in to the Fiery Furnace.  A well-worn path leads either uphill or downhill of the main parking lot.  We chose to go right.  The route descends into a main wash.  The first interesting feature is a slot canyon off to the right that contains a small arch you can hike under.  I had my son pose in the arch for a fun photo.  Back in the main wash, we hiked up a narrow slit in the canyon wall to the right as the wash made a sharp turn.  You hike up into another wash at this point and a couple of side canyons later on the left you will find one of the coolest spots in the park.  It is a small slot canyon that contains a double arch that looks like a pair of eyeglasses.  We ended our exploration with a side canyon to the right of the main wash. It contained a small arch that looked like water would flow through in the rain.  We retraced our steps back to the parking after a fun and challenging hike.  We got maybe a mile in three hours of hiking!

Plugin from the creators ofBrindes Personalizados :: More at PlulzWordpress Plugins