I reserved a parking space at the Maroon Bells to park at Maroon Lake. Unfortunately, two circumstances made photography challenging. One, the fall is a week late this year due to excess moisture during the summer. Only about 25% of the aspen had turned. Two, Maroon Lake is way low. I don’t know if it is beavers of releasing the water due to water compacts but the classic reflection shot of Maroon Lake is now impossible. Only about half the lake remains and the forest service has roped off the path and required to stay on it so access is about 50 feet from the water. The area is still beautiful but the iconic shot I fear is a thing of the past here. Luckily, the parking reservation system has limited crowds. I look forward to mid week when I can get back up in the high country to photograph the aspen.
Category: Landscape
-
Dream Lake Loop
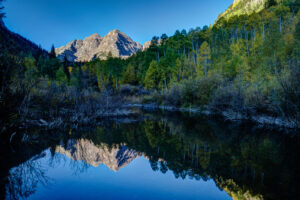
I hiked a loop from Bear Lake parking lot in Rocky Mountain National Park yesterday. I photographed the sunrise at Dream Lake and then ventured over the hill to Lake Hiyaha about 1 mile away. Although virtually at the same elevation, the two lakes are separated by a large hill that must be scaled. So the trail ascends and descends steeply form Dream Lake. Lake Hiyaha has a weird green mile color right now due to glacial sediment being disturbed. The lake itself is not very photogenic due to the presence of large boulders all along its shoreline. The tarn just in front of the lake was more photogenic in my mind. I then hiked the connector trail with the glacial gorge trail. About half a mile from the junction, there are two small tarns that are quite photogenic. I did get wet getting to the shore of one, however. It is quite the bog!
-
Ptarmigan Lake
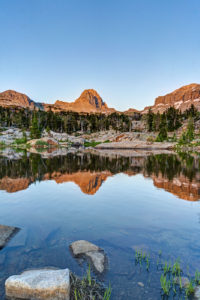
My son and I backpacked to Ptarmigan Lake near Cottonwood Pass last week. The lake is above treelike in a small valley in the Collegiate Peaks wilderness. The hike itself is relatively short which makes for a fun out and back. We were treated to a beautiful sunset.
To reach Ptarmigan Lake, drive 14 miles west of Buena Vista on Rd 306 (Cottonwood Pass). There is a sign for the parking lot on the left.. Hike south through the forest for 2 miles. The trail climbs steeply at first for the first 1/2 mile and crosses a couple of boulder fields. The levels off some over the next 1.5 miles. Around mile 2 it climbs a couple of switchbacks and you finally have some views of the surrounding mountains. A small tarn is on your right and a lake is off to the left. Continue for about 3/4 mile past the small tarn on the right before steeply ascending the last 300 feet to Ptarmigan Lake. There are several small tarn and lakes in this area. I found the one just to the left of Ptarmigan Lake to be the prettiest. You are above treelike here so caution may be warranted if storms are in the area.
-

Silver Dollar Lake Wildflowers
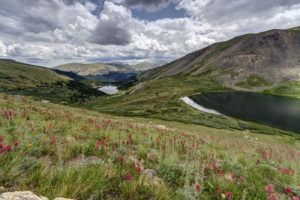
It is wildflower time in Colorado. The peak is just about past but there is still time to get out and enjoy the flowers. I did a short hike to Silver Dollar Lake and Murray Lake near the summit of Guanella Pass. The paintbrush were going crazy in the meadow between the two lakes. The hike itself is relatively short but is steep in sections. It is about 5 mile roundtrip. Most of it is above treeline as well. The views are amazing but oxygen is in short supply. The trail meanders through the forest for about 1.2 mile before veering left. It then switchbacks steeply above the private lake to your right. The flowers start in earnest along drainage areas about halfway up the trail. Enjoy!
To get to the Silver Dollar Lake trail, take the Guanella Pass road out of Georgetown, Colorado. Head south until reaching the campground near the summit. The turn for the trailhead is just past the campground and just before a steep switchback in the road. A parking area is on the right. Vehicles with a little clearance can easily make the higher parking lot about .75 mile up the road. Park before you reach the Naylor Lake lodge.
-

Grand Teton and Yellowstone
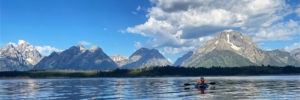
After backpacking to Alaska Basin, my wife and I spent a couple of days in Grand Teton National Park and Yellowstone National Park. With not a lot of time to spend, we hit some of the highlights of each park. We kayaked in Jackson Lake, took in the sunrise at Oxbow Bend, and then headed to Yellowstone. We caught the eruption of Old Faithful and toured around the Grand Prismatic Pool area. I really liked Firehole Falls at the beginning of the Firehole River canyon. The best was yet to come, however. I found a huge field of wildflowers near the shore of Yellowstone Lake and then we caught the sunset at Gull Point along the lake. What color! In the morning, we made our way out of the park to pick up our son at Buffalo Bill Boy Scout camp. There were more fields of flowers just before Sylvan Lake. The yellow was quite a contrast with the stark tree poles killed by forest fires in the area. Unfortunately, there was not much wildlife to be spotted. Only the occasional bison and elk. I think the heat had many animals hiding up high.
-

Alaska Basin
My wife and I just did a backpacking trip to Alaska Basin on the west side of the Tetons. The trip is not in Grand Teton National Park, but that makes it better in my opinion. There are no permits needed for the region and the scenery is just as iconic. The trail features several cascades, great wildflowers, and terrific mountain views. Alaska Basin contains several small ponds and lakes that make for some great photography.
The trail starts at the South Teton Canyon Trailhead east of Driggs, Idaho. The first 2 miles meanders by the creek and is fairly flat. Then the fun starts. The trail climbs steadily through four or five meadows that filled with wildflowers. The views of the surrounding mountains are good as well here. At mile 2.7, the trail intersects with the trail to the Devil’s Stairs on the right. This side trail makes a loop with the main trail up at the basin if you so desire. We met several people doing the entire 16 miles in a day. The main trail continues steeply upward from this point. It climbs above the creek and enters a pine forest. Around mile 4.5, the trail ascends steep switchbacks and arroiuves at a meadow filled with columbine and cow parsnip. The trail levels off at this point and crosses the creek at mile 5.4. This crossing is a little tricky, especially on the way back. Watch for loose logs and rocks. There are two very nice cascades in this area as well.
Starting at the 6 mile mark, the trail again ascends some rock stairs and arrives at a small meadow. Some nice views can be had here and there are nice fields of wildflowers in abundance. You can also see a large waterfall in the distance here. The trail then renters the forest and climbs up to the junctions with the Hurricane Pass trail at mile 7.7. This is where Alaska Basin lies. We day hiked this side trail but did not quite make it to the pass. This trail steeply climbs a rock bench to Sunset Lake with stunning views from above the lake. The route up to the pass is filled with wildflowers past the lake. Hurricane Pass provides panoramic views but I wimped out.
Back in Alaska Basin, we camped near one of the small lakes. Mirror Lake is the biggest of the six or so lakes in the area and is the most photogenic in my opinion. It also gets the most campers. The trail divides .1 mile past the junction with the Hurricane Pass Trail. Rather confusingly, the trail for Mirror Lake is signed as the left branch, but Mirror Lake is actually more easily accessed by the right branch trail to Mt Meek Pass. No matter. Each of the lakes has a little different view and is worth exploring.
One of the amazing features of this valley is that the sun has very little blocking it as it sets to the west. Thus, the mountains behind the lakes light up and turn amber and red in the evening light. It is quite a sight to behold. The back side of South Teton dominates the scene.
Getting There
Take Highway 22 west of Jackson, WY to Victor, Idaho. The road becomes Highway 33 in Idaho. Follow the road north to Driggs. Turn right on Ski Hill road and follow it about 5 miles. Turn right onto Teton Canyon Road. Follow the dirt road for about 4.6 miles until it dead ends at the South Teton Canon trailhead.
-

Bent’s Fort
On a rainy day while camping, my son and I decided to visit Bent’s Fort near Las Animas in southeastern, CO. The fort has been restored to the original version based on drawings of a military officer who stayed there in the 1840s. The original fort burned down in 1849. It is an interesting place to visit. It gives you a feel of the old southwest and it is an oasis of green in an otherwise dry area. Its position along the Arkansas River creates a good environment for the cottonwoods and cattails surrounding the fort.
My son and I camped at Pueblo Reservoir about 70 miles to the west. We caught a beautiful sunset there as well. Amazingly, the rain held off at Bent’s Fort as it rained for 9 straight hours just to the east of there.
-
Grand Staircase Escalante
I took advantage of our record warm weather this past week to head out to Utah and explore the Grand Staircase Escalante National Monument. There were a few places I had been meaning to photograph for years so I was glad I finally had the opportunity to get back out there. Zebra Canyon in particular has been on my radar and I am happy to report I finally made it there.
Horseshoe Canyon Grand Gallery
My trip started with a stop at the Horseshoe Canyon unit of Canyonlands National Park. This is where the Grand Gallery pictograph panel is located. It is in a remote part of the park that is located off a dirt road about 25 miles from the main highway. The hike itself is beautiful. Most of the hike is an easy stroll through the lush Horseshoe Canyon after descending a short slickrock slope at the start. The canyon is very verdant and a striking contrast to many parts of Canyonlands. The pictograph and petroglyphs start appearing about 1.5 miles into the hike. Several panels can be seen along the route. The most prominent ones are located in the Alcove at the 2.5 mile mark, and the biggest one is found in the Grand Gallery at mile 3.5. There were even a few wildflowers to liven up the hike.
I also stopped at nearby trail for Colonade Arch or as it is also known Five Hole Arch. Located just outside the national park, the trail starts at the end of a 4×4 road located about 5 miles north of the entrance to Horseshoe Canyon. You simply turn north on Road 1010 as you exit the entrance road for Horseshoe Canyon and then make a right on the first signed road at the 5.2 mile mark. This short 3.5 mile road is very rough in spots with exposed rock sections. A 4×4 is definitely required (as a woman told me who I met at the trailhead, “Put some decent tires on your X5”). The trail leads north of the parking area out over a section of slickrock. It then follows an old road bed past a large wooden fence and continues northward for about .75 miles. The trail then veers eastward toward the Green River at a large cairned rock outcropping. The trail leads eastward for about .5 mile. The cairned route becomes hard to follow at points. The way leads steeply downward to a second level of slickrock (I had to clamber on hands and knees up a 10 foot section on the way back). Colonade Arch is then just around a bend to the left. The arch itself is impressive. It has four openings with a fifth being a pothole arch just in back of the main openings. Photos don’t do this place justice. The arches are quite large. I was impressed with this little known arch.
Goblin Valley State Park
I next stopped at Goblin Valley State Park. I camped here and had fun walking around the large collection of hoodoos the park is known for. I hadn’t made it back to this place after my camera was stolen out of my car a couple of years ago at Crack Canyon. This time, thankfully, there was no drama. I took in a nice sunset and got up for sunrise the next morning. Unfortunately, I was met with rather hazy overcast so it was not too impressive. While I was at Goblin Valley, I did stop by Little Wild Horse Canyon. It is a very short hike through a nice slot canyon. It has two sections of narrows and the hike is easy. I love the swiss cheese rock that adorns the walls of this canyon.
I also stopped at the trail to Wild Horse Window. This is a challenging 1 mile hike. Located off the park road just past the junction with Temple Mountain Road, the trailhead for this hike is located at the end of a short dirt road. To get there, turn left onto to the Goblin Valley Road at the junction with the Temple Mountain Road. Go about .3 mile and turn down the short dirt road to your right. The hike then leads down a short trail into and out of the wash below. The trail then proceeds north, steeply up slickrock. There is no real trail from here. You just aim for what looks like a large cave directly to your north. Unfortunately, as you hike you lose sight of the cave pretty quickly. The route requires you to stay to your right to avoid the large canyon to your left. Then, you must veer a little more right to avoid a large rock outcropping to your left. If you find yourself in a sort of mini canyon with rock faces to either side, you’re in the right place. You will then cross a sandy area that again leads steeply upward. Hug the left wall here and you should be fine. You then pop out in the area where the Window arch is located. The arch looks from the outside like a pair of eyeglasses. It has a large pothole type arch is back of the main entrance. This indeed is a cool little arch.
Neon Canyon
That afternoon, I headed over the Burr Trail road in Capitol Reef National Park. Regrettably, the winds were gusting over 50 mph so I headed to my campsite for the night. In the morning, the winds eased and the skies cleared so I headed down to the Grand Staircase Escalante National Monument between the towns of Boulder and Escalante. I took the Hole in the Rock Road and prepared to do some more exploring of slot canyons. First, I stoped at Neon Canyon. This is located along the Escalante River in an area known as Out of Egypt. To get there, you have to negotiate a 10 mile long 4×4 road. To reach the trailhead, you turn left on the dirt road at mile marker 17 where a road is marked with a small sign “Out of Egypt.” No section of this side road is particularly hard, but caution is needed in several spots, including crossing a 200 foot section of slickrock at around the 7.5 mile mark. The road roughens from here until reaching the trailhead at its end. Once at the trailhead, you see what makes this hike challenging. You descend 500 feet in the first 1/2 mile down a steep section of slickrock. The route is marked by cairns but it still feels rather intimidating. After reaching the wilderness marker, you have a decision to make. You can either continue on the main trail which takes you around the very deep Fence Canyon and requires a backtrack of about 1.25 miles, or you can veer right onto an alternative path that takes you overland across the sand dunes and slickrock. The Fence Canyon route is easy to follow (there are cairns and hundreds of footprints) and eventually leads around the northeastern edge of Fence Canyon. Once you are at the bottom of the canyon, you turn right and head down the Escalante River drainage. You have to wade the Escalante River at least a couple of times in what will be calf to waist deep water depending on the time of year (it was not even up to my knees this April). You will pass a large camping area and then enter the river agin before coming to a longer section of trail that will access the mouth of Neon Canyon.
The alternate route has the virtue of being shorter but requires more navigation skills. The way is cairned in spots but the route can be difficult to find at times as well. After you veer right at the sign mentioned above, the route makes it way over a rocky area before ascending a large rock face. It then descends the face and veers sharply to the left. It then makes another turn to the right to head down a large sand dune. You are aiming for Choprock, a large rock outcropping with dark vertical stripes in it that guards the entrance to Neon Canyon (you can see the rock from the trailhead but will soon lose it off and on as you walk). A word of caution. If you are going to take this route, take it down but don’t take it back up. I make this mistake and you will pay for it. You have to ascend a 300 foot section of sand dune and then climb another few hundred feet to ascend that large rock butte I mentioned above. I also missed the sharp turn to the left and found myself staring into the steep abyss of Fence Canyon. Eventually, I backtracked and found the route back to the main trail. I then faced the grim reality of ascending the five hundred feet of slickrock at the end after an already tiring return trip.
So was all this effort worth it? You bet. Neon Canyon is amazing. The end of the trail is marked by the Golden Cathedral, two large holes in the striped canyon ceiling of Neon Canyon. Canyoneering experts actually repel through these holes on their way down Neon Canyon. I have never seen this done live, unfortunately, but it would be a sight to see. From the Escalante River, Neon Canyon itself is about a mile walk and it is a beaut. The reflected light makes the canyon walls glow a gorgeous shade of orange. The newly leafed cottonwood trees made this especially pretty in April.
Harris Wash and Zebra Canyon
I have wanted to see Zebra Canyon for a number of years. Its striped walls draw hundreds of photographers every year and now I can see why. It is an exceptional place. Yet, I can’t help but think Harris Wash gets short shrift due to all the attention the slot canyon gets. Harris Wash itself contains some of the most fantastical rock formations I have seen. I loved exploring each bluff and butte, each one crazier than the next. Want weird rock formation and spires? Check. Wash crazy zigzag patterns in the rock? Check. Want bicolored rock? Check. Want striped rocks that disappear into the horizon? Check. I have to admit that if I ever go back to this area I will want to backpack to Harris Wash just to photograph more of these amazing rock formations.
Okay, now onto Zebra canyon. The hike takes you overland above the wash for about 1 mile. You then drop into the wash and the fun begins. You pass through a wooden gate in about .5 mile and quickly come to the mouth of the side canyon as it drains into Harris Wash. The wash is amazingly wide and could be a river if it were perpetual. Luckily, the wash is dry except during thunderstorms. Cross the wash and veer left at a 45 degree angle. Follow the trail of footprints to the mouth of Zebra Canyon. In spring the mouth will likely be dry as it was for me but after rains, the mouth will be full of water, even into early winter. So come prepared for any conditions. The biggest challenge is now squeezing through the canyon to see the good stuff. The narrows are only about .5 mile long but are extremely narrow. Bring elbow and knee pads. I have scrapes all along my knees and elbows to prove the point. Shimmying up the canyon walls is the only way to get through. But the narrows are amazing. The color and patterns are striking. The walls are striped and the curves look like they have been expertly sculpted. Nature is truly artistic.
Dance Hall Rock and Hole in the Rock Road
Located toward the end of Hole in the Rock Road (at mile 37) one finds Dance Hall Rock. It is a seemingly nondescript stop with a small parking area but don’t be fooled. The area is worth a visit. First, the name is misleading. It is not one rock but many large sandstone mounds, each about 50 feet high. Once on top of the rocks, things get interesting, The rocks contain potholes which can make for some really unique photography. Several have trees growing out of them. The problem of course is contrast. Unless you shoot the rocks at midday, the potholes will be encased in shadow. I liked shooting a couple of hours before sunset, so the rocks had a nice glow to them but shadows weren’t too bad yet. Be prepared for more than a short walk as well. The mounds extend for about a mile. I also found staring down into large potholes while on top of a 50 foot tall rock to be disorienting. Hopefully, the winds will be calmer than when I was there.
I also stoped at the parking area for Upper Dry Fork. The Lower Dry Fork is famous for its easy access to Peek-a-Boo and Spooky slot canyons. The Upper lot also can access those canyons but with a longer walk. Instead, I walked the Rim trail here looking for cool shots near sunset. The trail gives you a nice overview of the rock formations that can be found in the Upper Dry Fork canyon. A stroll through the canyon would also be productive, given the open nature of the canyon before it enters a section of narrows after 1.5 miles or so of hiking. The only downside to these hikes is having to drive Hole in the Rock Road which might as well be dubbed Hole in the Tire Road. It is a long, dusty and very bumpy road. The washboard on this road is terrible after about mile 20. It was not a pleasurable experience driving the last 15 miles or so to Dance Hall Rock. 4×4 is not required for this section of road but tough tires would sure be a comfort.
-

Charleston, South Carolina
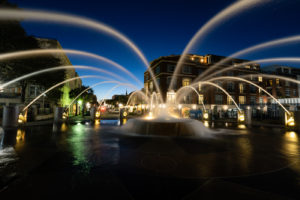
I had the chance to visit Charleston, South Carolina over spring break. Spring is a great time to visit Charleston. The azaleas and camellias were still blooming and I enjoyed walking around the city on a pleasant sunny day.
Magnolia Plantation
The Magnolia Plantation is one of the centerpieces of Charleston, SC. The plantation house has extensive grounds and gardens that can be toured. As part of the tour, the Plantation also provides a slave history tour of the four remaining slave cabins on the property (11 were originally present). Built in 1850, the cabins housed slaves for the final fifteen years of legalized slavery and were lived in up until 1990. The tour provided some insight into the lives of slaves and the dangers of growing rice, the main cash crop of South Carolina in the 1700 and 1800s. The grounds themselves feature beautiful gardens including 1,000 varieties of camellias.
French Quarter
Later in the afternoon, we walked around the French Quarter. One of the coolest things about Charleston is that much of the colonial housing and architecture has been preserved. There are any number of churches, homes, and parks to stroll through in the old part of the city. Not to mention many fine restaurants to eat in when you’re done. St Michael’s and St John the Baptist were two of the churches I went inside. St John the Baptist was recently painted in 2019 and looks brand new inside. I especially liked Waterfront Park with the pineapple fountain and splash fountains. I capped off my evening with a stroll through battery park and ogled the mansions backstopping the park.
Sullivan’s Island
I took the Ravenal Bridge across the bay to Sullivan’s Island the next morning. I photographed the sunrise on Sullivan’s Island along the beach. The area also has Fort Moultrie to explore, one of the forts defending the city during the Revolutionary and Civil Wars. Many of the cannons are still present. It is a photogenic spot to be sure.
Nathaniel Russell House
The Nathaniel Russell House is one of the historic homes that have been preserved and that are open to the public in Charleston. The furnishings have been restored in the home to make it look as though it would have in 1808. The house has a beautiful interior and its centerpiece is the circular staircase that adorns the entryway.
-

Emerald Lake Trail
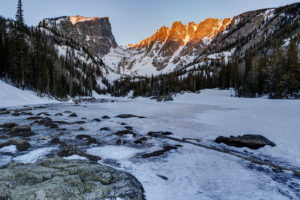
One of my favorite places to visit in Rocky Mountain National Park in winter is the trail to Dream and Emerald Lakes. The first light hits the mountains behind the lakes at just the right angle at sunrise while it takes several minutes longer to hit the peaks in other nearby valleys. I snowshoed up the short mile-long trail this week to catch the sunrise. I was not disappointed. I got good color on the peaks and even had some clouds to make for good color in the sky. I even stopped to shoot some macros of the ice on Dream Lake. The fierce winds in this area make for some spectacular patterns in the ice.
