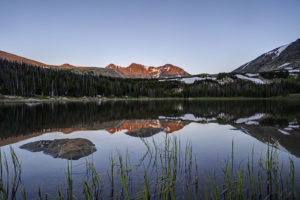
My boys and I backpacked to Willow Lake in the Sangre de Cristo mountain range near Crestone, CO last weekend. It is a challenging hike, but the beautiful lake at the end of the hike makes it a rewarding one. It is surrounded by mountains in a narrow bowl including Kit Carson and Challenger peaks, two fourteeners. The trail climbs 2900 feet in 5 miles and is not for the faint of heart.
The hike begins by climbing steadily up switchbacks through aspen and coniferous forest. After a mile, the switchbacks steepen as the trail climbs to a meadow (this is the second hardest portion of the hike). Views of Kit Carson peak open up here. Catch your breath as the next half mile is the only easy section of trail. The trail descends near the meadow and then begins a steady climb upward. More switchbacks await as you climb through the forest. Around the 2.5 mile mark, you will pass a large campsite on the left. The trail continues up switchbacks until leveling off briefly at a stream crossing at mile 3.5. Rest here and take in the pretty waterfall because the next half mile is the steepest of the trail. The trail climbs up through rock scree as it scales a sheer rock face. This section was as steep as any mountain pass I’ve climbed.
The demoralizing aspect of the trail hits you in the last section. You’d think you’d be done after the last ascent, but there is still another mile to go with yes more switchbacks. You finally arrive at a meadow below Willow Lake where camping is allowed. No camping is allowed at the lake itself. The meadow will be crowded as climbers hiking Kit Carson and Challenger use it as a base camp.
Finally, if you want to visit Willow Lake climb past the meadow on a steep, rocky path. A social trail through downed timber skirts some of the shoreline. Great views await at the lake with a waterfall draining into the back of the lake as an added bonus. The reflections in the lake were amazing near sunset. The only drawback is that very little of the surrounding mountains are lit with sunlight as the bowl faces diagonally and not much direct sunlight hits the basin. Also, don’t expect to find many fish in the lake. I saw only one brook trout.
Getting There
To reach the trailhead for Willow Lake (or South Crestone Lake), take Highway 17 to Moffat (between ALamosa and Salida) and turn east onto County Road T. Follow the road to the town of Crestone and then follow the signs for the Willow trailhead. A rough two mile dirt road takes you to the trailhead. A small parking lot holds about 30 cars, so be prepared to park down the road during busy days.
Kit Carson Peak, Willow Lake trail, Sangre de Cristo range, Crestone, CO
Cascade, Willow Lake trail,, Sangre de Cristo range, Crestone, CO
Columbine, Willow Lake trail,, Sangre de Cristo range, Crestone, CO
View of Meadow, Willow Lake trail, Sangre de Cristo range, Crestone, CO
Kit Carson Peak, Willow Lake trail,, Sangre de Cristo range, Crestone, CO
Sunset, Willow Lake, Sangre de Cristo range, Crestone, CO
Willow Lake outlet, Sangre de Cristo range, Crestone, CO
stars, Willow Lake, Sangre de Cristo range, Crestone, CO
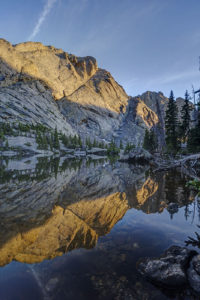
The Lost Lake trail in the northeast corner of Rocky Mountain National Park provides access to a number of lakes and some good fishing. The reward after a long trek is some fine alpine scenery.
I hiked the trail to Lost Lake in one long day. It took about 10 hours to make the 9.7 mile climb up to the lake. The trail is benign for most of its journey but 2 steep sections provide for most of the 2800 foot elevation gain. The trail starts at the Dunraven trailhead north of Estes Park and spends the first half meandering through the Comanche Peak Wilderness. At the start, it descends 200 feet to the Big Thompson River and crosses the river at a newly installed bridge (the old one was washed away along with several others in the flood of 2013). The trail parallelss the river for a long flat stretch as it passes through private property. You cross the river again and pass a large horse stable. The trail stays flat for the next mile and a half as it works its way along the river.
At mile 3.5, the trail begins its steep ascent to the national park boundary. The trail climbs steeply through aspen forest and lodgepole pine. The river quickly disappears in this stretch. The trail mellows out as it reaches the boundary and passes the intersection with the Boundary Trail. The trail now follows the river for the next 1.5 miles on a fairly flat grade. Around Happily Lost Wilderness campground, the trail once again steepens around mile 6.7. You pass a junction with the Stormy Peak Pass trail and continue grinding upwards along the rocky trail. The thundering Lost Falls can be heard through the trees but to actually see it, you’ll have to cut left into the forest through downed timber just past the trail junction. Lost Falls is a pretty, 60-foot cascade, but the view is partially obscured by rocks and trees.
Back on trail, you pass a few more wilderness campsites. The trail flattens out again after Lost Meadow. The lake is now only a mile away. There are four camp sites near the lake, although none really provide a good view of it. I camped at one of the upper sites.
The lake is in a pretty basin with Rowe Peak towering in the distance. You can ascend a social trail through the trees to the left of the lake to reach the upper basin where the scenery becomes spectacular. Husted Lake and Louise Lake lie to to the south of Lost Lake in this upper basin. Unobstructed views of Rowe Peak greet the visitor. So does wind. It was unrelenting in the three days I spent in the basin. The more adventurous can even explore the Dunraven Lake basin to the east, but large snow fields blocked entrance during my visit.
The lakes in the area all support a good cutthroat trout population which proved fun to fish during my stay.
Lost Lake, Rocky Mountain National Park, CO
Wildflowers, Lost Lake trail, Rocky Mountain National Park, CO
Columbine, Lost Lake, Rocky Mountain National Park, CO
Paintbrush, Lost Lake, Rocky Mountain National Park, CO
Columbine, Lost Lake, Rocky Mountain National Park, CO
North Fork Big Thompson River, Rocky Mountain National Park, CO
Husted Lake, Rocky Mountain National Park, CO
Alpine Sunflowers, Husted Lake Basin, Rocky Mountain National Park, CO
Alpine Sunflowers, Lake Louise, Rocky Mountain National Park, CO
Columbine, Lost Lake Trail, Rocky Mountain National Park, CO
Booth Falls is a strenuous hike to a 60 foot waterfall in the Gore Range in the Eagles Nest Wilderness near Vail, CO. The falls plunge down a steep crack at the top of a rocky canyon. Views of the cascades above the falls are easy but a steep drop over a small cliff restricts the views of the actual falls themselves.
Booth Falls, Eagles Nest Wilderness, Vail, CO
The hike to Booth Falls begins steeply as the trail switchbacks above the parking lot. After a half mile the trail eases a little as it follows Booth Creek. Around the 1.25 mile mark, the trail then climbs very steeply up to a rocky bench as ascends through an avalanche zone filled with raspberry and huckleberry bushes. The falls is located off the left side of the trail just past the 2.0 mark. Expect it take 1.5 hours to reach the falls. The trail continues above the falls, reaching Booth Lake in about 5 miles from the trailhead.
To get to the trailhead, take I-70 to Exit 180 in East Vail. Turn right at the exit and then make a left on the frontage road. Drive for a mile and then turn right at the sign for the falls. If the main lot is full, overflow parking can be usually found at the Vail Mountain School just down the rod.
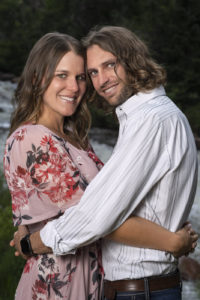
I had the pleasure of photographing an engagement session for Caitlin and Zach at Eldorado Canyon State Park this week. They are a fun couple to work with and I always enjoy meeting another social studies teacher. Go Caitlin!
Caitlin and Zach are getting married next summer at the Elizabeth Hotel in Old Town Fort Collins. They have a great story to tell. Like many couples, they met in 2013 through mutual friends. However, it wasn’t until 2016 that they officially started dating after Zach asked her to be his date to his brother’s wedding. Since then, they have been inseparable, traveling to Europe to see Ireland, Northern Ireland, Scotland, Croatia, Greece and Germany.
After four years of dating, Zach proposed on their 4th anniversary. After a night out for dinner and drinks, Caitlin walked in the house to discover rose petals and candles everywhere. That’s when Zach got down on one knee and asked her to marry him! According to Caitlin, it was the easiest question she’s ever been asked!
When not working or traveling, Caitlin and Zach are both fitness nuts. They’ve done 2 half ironmans together, as well as many other triathlons, tough mudders, 10ks and 5ks.
Their wedding will take place on June 26, 2021 in Fort Collins, CO. Since they are both CSU grads, it seemed the perfect choice. Family will play a big role in their wedding as Caitlin’s brother will officiate and Zach’s brother will be his best man. Best wishes to a fun couple that was a lot of fun to work with.
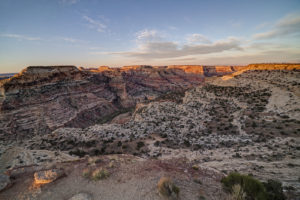
The San Rafael Swell covers a large area of southern Utah. It runs from just north of Capitol Reef National Park northward along a narrow spine towards the town of Price. Along the way, myriad canyons and other weird features dot the landscape. I visited a few of the hallmarks of the area on a recent trip before my camera was stolen. Luckily, I have some images from my drone and backup camera to preserve the memories of a very interesting place.
Wedge Overlook
Now that the shelter in place restrictions have been eased somewhat for travel to Utah, I took advantage of the slow time on my calendar and visited a place I have been meaning to get to for the past five years. The Wedge Overlook looks out over the San Rafael River as it winds through Utah’s Little Grand Canyon. It offers a spectacular view of the river canyon below and it a great place to camp and watch a sunset. The Wedge is fairly unknown thanks to its somewhat remote location off off I-70. That said, there were still 30 or so people camped out on a Monday in May so you won’t be alone, either. It is about 30 miles north of I-70 and fifteen miles east of the town of Castledale. It can be reached either from the east or west, depending on how much dirt road you want to travel. Take I-70 to exit 99 and head north to Emery and then Castledale. Turn right onto a well-marked and smooth dirt road just north of Castledale (Green River Cutoff). After 13 miles, turn right on the road to the Wedge (you’ll pass a large picnic shelter and parking lot). Go six miles to the end of the road. Ten primitive camping sites are available along the road (plus other unofficial ones). Alternatively, you can take the Buckhorn Draw Road north to the Green River Cutoff. This road is located at exit 131 (previously marked exit 129). This is a much rougher and narrower dirt road so the 20 mile drive north will take longer. Whichever way you go, be sure to check out the Buckhorn Draw petroglyph panel. It is spectacular, located on the Buckhorn Draw Road, just a couple of miles south of the Green River Cutoff.
Wedge Overlook, Little Grand Canyon, San Rafael Swell, Utah,
Wedge Overlook, San Rafael Swell, Emery County, UT
Wedge Overlook, Little Grand Canyon, San Rafael Swell, Utah
Goblin Valley
Goblin Valley State Park features some short hoodoos (weathered sandstone blobs) that make for some good photography subjects. Limited camping is available in the park but many primitive sites are available just outside the park on either Temple Mountain Road or Behind the Swell Road. The hoodoos can be reached via a short hike from the parking lot. Head toward the large green “mountain” straight out from the parking lot. The best collection of hoodoos can be seen from here.
Goblin Valley State Park, UT
Crack Canyon
Crack Canyon is an interesting slot canyon located just off Behind the Swell Road near Goblin Valley State Park. The Canyon does not feature the incredible narrows of other nearby canyons such as Little Wild Horse but it does have really interesting rock formations. It also has the namesake “crack” located about a mile from the trailhead. About 2.5 miles of the canyon can be easily hiked but then you have to slide down a rope down a 10 foot drop. It is easy to get up the rope but not so easy to get down, especially with a pack on. I turned around here but other hikers successfully slid down. Crack Canyon provides a nice alternative to the more well known Little Wild Horse slot. I ended up here because Little Wild Horse was closed due to a search and recovery action. Two girls died in a flash flood there the day before I came. So as always, be aware of the weather when entering any slot canyon. The danger of flash flooding is real.
To reach Crack Canyon, take the Temple Mountain road and go north from Goblin Valley. After a couple of miles, go left on Behind the Swell Road. This is a fairly rough road, so 4×4 may be advised. Go four miles and the trailhead is on the left. The trail follows an old road at the start and then enters the wash of the canyon. Follow the wash down the canyon. There is one spot where you will have to go around a rock fall. Be cognizant of your surroundings so you can find your way back. There are some false trails I found myself unintentionally exploring.
The Crack, Crack Canyon, San Rafael Swell, UT
Crack Canyon, San Rafael Swell, UT
The rest of the Swell has countless interesting formations to check out along with several petroglyph panels and other rock art. The Buckhorn Draw Road featured some interesting rock formations and buttes. I flew my drone over a couple to get a closer view. There were also a number of wildflowers blooming in the open spaces. I took a quick detour to check out the Head of Sinbad petroglyphs. They were not that interesting. It featured only two small panels. If you want to see them, take Temple Mountain Road south from I-70 and then turn off toward the Head of Sinbad. A small side road goes under I-70 and back about a mile on the north side of the highway to access the side of the butte to view the rock art (4×4 is necessary to get through the sandy conditions).
I drove the length of the Temple Mountain Road from I-70 and most of it is uninteresting. However, about 10 miles north of Goblin Valley the scenery gets more diverse and you are rewarded with some wide-open views of the area.
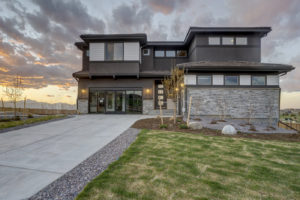
I had the opportunity to photograph the Epic Homes Pinnacle model home at Anthem Reserve near my home in Broomfield, CO. Thanks to Epic Homes for letting me photograph their beautiful show home. I photographed each room and also put together a 360 virtual tour, composed of 22 panoramic photographs. The virtual tour is hosted on Kuula.co.
The Pinnacle model is the largest of the homes Epic is building in Anthem Reserve located at the intersection of Lowell Blvd and Sheridan Parkway. It is 4,170 sq. ft with approximately an additional 1,500 sq. ft in the basement. It features a great room and an elegant master suite. The model is a garden level and looks out over the mountains. Anthem Reserve sits on one of the highest points in Broomfield, so it has stunning views of the Front Range. Lots are larger in the Reserve as well, ranging from 10,500-12,500 sq. ft.
Epic Homes is an independent home builder based in Denver owned by Chris Presley. More information on their homes can be found at Epic’s website.
Boulder sets its all-time record for snowfall in a winter with this past storm. The spring snow storm dumped 15 inches on the city bringing the annual total to 151 inches. April has been a very snowy month so far. It was a beautiful morning to be outside despite the 5 degree temperatures. I am not a big fan of spring snow, but I know the snow is great for the plants. Can’t wait for the wildflowers to show up in June!
The wedding bouquet is a beautiful yet utilitarian part of the wedding entourage. It is a useful prop that gets abused more than it probably should. The bouquet gets handed off innumerable times during a wedding and finally gets thrown into a crowd for one of the bridesmaids to try and snag.
Portrait Set-up
Despite all that abuse, I think the wedding bouquet is one of the most beautiful aspects of the wedding day. To properly capture its glory, I came up with the idea of taking a high key portrait of it to preserve its beauty before it gets tossed around too much. A high key portrait means that the light is set to overexpose the scene. The idea is to get the background to blow out or clip. For best results, a white background should be chosen for this type of portraiture. In human portraiture, a white scrim or backdrop cloth can be used but on location at a wedding, a white linen tablecloth or other translucent white fabric will work perfectly. The sun or other bright light light source like a flash or strobe should be set behind the bouquet to back light the flowers. Take a series of exposures starting at an even exposure and then progressively increase the exposure until the detail in the flowers start to white out or blow out. The last step is assembling the final product in Photoshop. Some layer blending is required to balance background and the detail in the flowers. The final product should look something like this:
High key wedding portrait of wedding bouquet
Since we are under a stay-at-home order due to COVID-19, I had to improvise my set up a little for this shot. I made my own wedding bouquet from flowers I purchased at the grocery store and a ribbon we had lying around the house (don’t make fun of my lack of floral arranging skills too much). I used a white sheet as my backdrop, and I posed the bouquet on a table in from of my glass screen door. The sun is a great diffuse light source as it comes in through the sheet.
Taking good photographs of real estate is challenging because of the high degree of dynamic range (the difference between lights and darks) in the scene. If the photographer exposes for the scene out the windows, the interior will likely be too dark. Conversely, if the photographer exposes for the interior, the windows will be blown out. Here is an example of what I mean. In the first photo, the window looks great but the interior is dark. In the second photo, the reverse is true.
Master bedroom ambient light exposed for windowMaster bedroom, ambient light exposed for room
Many real estate photographers offer HDR (high dynamic range) blending as a way to compensate for the issue of dynamic range. While it does make the resulting photo look more like our eye or our brain would envision the scene, it doesn’t fix all problems. Let’s look at the photo below. While it is certainly better than the above two examples, it is far from perfect. The color is off, and not all parts of the bedroom are evenly lit. Some are still in deep shadow.
Master bedroom, HDR blend of 3 exposures
This points to a second problem with lighting in most real estate scenes is–it is coming from multiple sources. Daylight or ambient light is often pouring in from the windows and mixing with artificial lighting inside. What you get is a something of a lighting Frankenstein. To fix this problem, a photographer can use flash to overpower the ambient and artificial light in the room and get a much more even color cast throughout the room. For this scene, I positioned two flashes a little behind and to either side of the camera. They are pointed up toward the ceiling and angled back a little. I put them about 3 feet below the ceiling to get the best bounce from the ceiling. Another benefit of using flash is that the window scene can be properly exposed for while still lighting the interior of the room. Sometimes, however, this can give a somewhat flat or fake look to the photos. Thus, the best solution is to blend the flash photo with a little bit of the ambient light from the HDR blend to get the best of both worlds. Now, the scene is evenly lit, the color is consistent, and some directionality of light can still be seen.
While it takes a little more effort than simply bracketing exposures and using HDR processing, the results speak for themselves. You get a higher quality image to deliver to your client.
There are a variety of lighting techniques a photographer can use for lighting an outdoor portrait, ranging from using existing light (incident) without any artificial light enhancement to studio strobes equipped with light modifiers. This article discusses a few of those techniques and tries to show the differences between using each of them. Knowing what lighting technique the photographer will be using is critically important for the customer as well in trying to decide between photographers. Different customers have different “looks” they are after and knowing what technique produces each look will assist the customer in making the correct decision on a photographer. FYI, if you are a customer desiring a well-balanced, evenly lit portrait, don’t hire a photographer who shows up to the job holding just a camera. They won’t get the desired effect you’re after. Photographers who are comfortable using all of the above techniques, rather than just specializing in one, can broaden their appeal to customers as well.
Incident Light
The first technique I want to discuss is using available light or incident light to create a portrait. This is the easiest technique to use for the photographer because little or no extra equipment (besides the camera) is often needed. It is perhaps the most difficult, however, to achieve the desired end result–a well-exposed portrait. Some very experienced environmental portraiture photographers can achieve beautiful results using a combination of reflectors and diffusers, but this increases the amount of equipment (and assistants) needed to take the photo.
The biggest hurdle that has to be overcome with this technique is the huge contrast range between the background and the person’s face. As can be seen from the two photos below, this means that either the background is properly exposed and the person’s face is in shadow, or the reverse is true.
Incident light portrait exposing for subject’s faceIncident light portrait exposing for background Incident light exposed for subject’s face
As you can see, the contrast is too much for the camera to handle. Either the background or the person’s face looks properly exposed. This can be handled in one of three ways–exposing for the background and adding light with a reflector to fill in the shadow, exposing for the background and adding artificial light with a flash, or waiting for a cloudy day to cut down the contrast (problematic in a place like sunny Colorado). I’ll discuss a couple of ways how to use flash to fix this. I’m not the biggest fan of reflectors since it requires an assistant to hold one (wind often blows the reflector out of position if just a stand is used to hold it), and their use often causes the subject to squint as you shine light back into their face. When done properly, however, the effect can be stunning as nice warm light is reflected onto the person’s face to fill in the shadows.
On-Camera Flash
The smallest and simplest way to fix the lighting conundrum above is to use a flash positioned atop the camera (these flashes which fit onto the hot shoe are known as speedlites). The idea is to add a small pop of light onto the subject’s face to balance out the portrait. While on-camera flash gets the job done, the results can be rather crude. As you can see from the examples below, the lighting is flat since the flash is fired directly at the subject.
Exposing for background using on camera flashExposing for the background using an on-camera flash
Off-camera Flash
If you want to add dimensionality to the person’s face, the flash has to be taken off camera and positioned more to the side. Think of a Rembrandt portrait, for instance. The light does not fall directly on the subject but comes from the side to give the face a more distinctive look. There are a number of ways to achieve this side lighting effect. The first involves simply turning the flash that is sitting atop the camera to the side and bouncing it off a white reflector. Again, I’m not crazy about reflectors outdoors, so the better solution IMHO is removing the flash from the camera altogether and placing it atop a light stand. You can use the same speedlite or a more powerful battery-powered strobe for this purpose. And while strobes are a lot heavier and bulkier, they have far more power to allow for the use of bigger light modifiers which can produce striking results.
Bare bulb flash
The first way to do this is position a flash to the side of the subject without use of any light modifiers. This adds dinesionality but the look is a little harsh.
Off-camera flash without modifierOff-camera flash without modifier
Off-Camera flash with modifier
A far better way to use off-camera flash is to attach some sort of modifier to the flash to soften the light. Think of holding a white sheet over your head on a sunny day. The light becomes much softer. For outdoor use, I prefer either a shoot through umbrella (a translucent umbrella that is placed in front of the flash) or a beauty dish or octagonal softbox. Now as you can see below, the light quality softens but the light directionality is still maintained.
Off-camera strobe with shoot-through umbrella Off-camera strobe using shoot through umbrellaOff-camera strobe with beauty dish
So the next time you take a portrait outdoors, try one of the above techniques to improve your photography. Or better yet, the next time you hire a photographer for an outdoor portrait, you’ll know what questions to ask the photographer about what equipment he or she will be using so you can be more confident in getting the results you want.